(Photoshop Friday and Scrapbook Saturday are a day late this week thanks to BOTH my blog AND Photoshop wigging out on me yesterday.)

Whenever you are about to print a photo or share it online, one of your last steps should be to sharpen it. Whenever you resize your photo–either making it larger OR smaller–you’ll need to sharpen it.

Here’s the picture we’ll be working with:

denver family portrait bubble blowing

I have always used the “unsharp mask” feature (FILTER>SHARPEN>UNSHARP MASK):
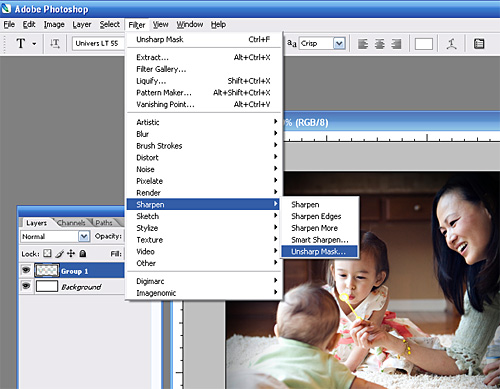
photoshop tutorial screenshot

Next you get a little pop-up window that asks you to pick your settings. This is the setting I usually use, but I think every photographer finds one that they like best:
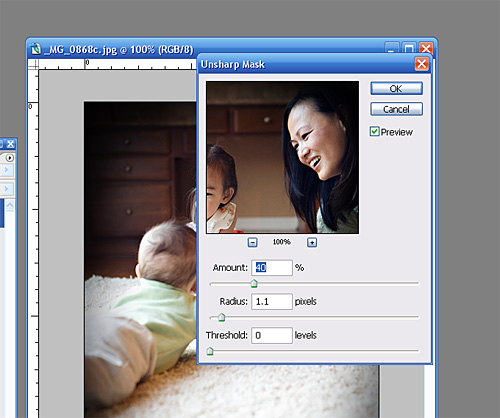
sharpen mask photoshop tutorial

Yesterday a fellow photographer taught me a new technique that I like a lot.  It gives you a little more power to fine tune the effect.

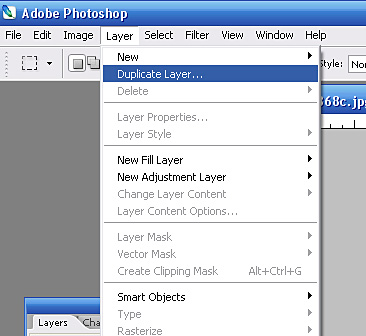
Start by making a duplicate layer of your photo (LAYER>DUPLICATE LAYER):
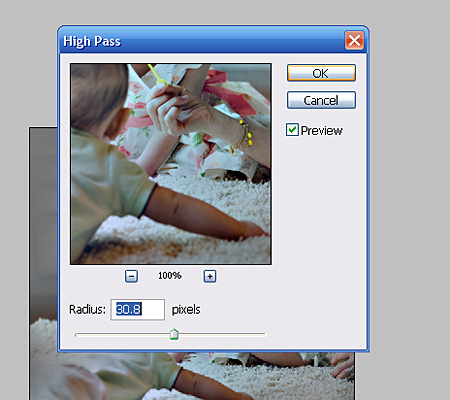
Then you head over to the filter drop-down again, but this time you’ll select OTHER>HIGH PASS:
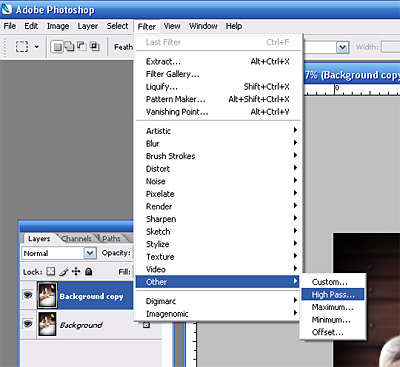
It will give you another pop-up prompt. Pick something around 30px:
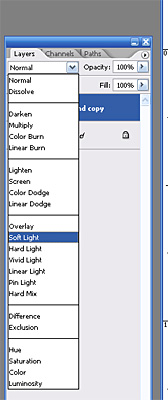
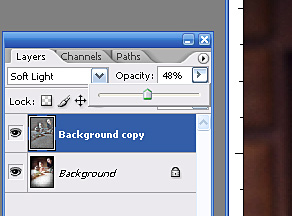
Now it’s time to make the scary gray disappear. In your layers menu, change it from “normal” to “soft light” and then adjust the opacity of the layer to whatever seems right.
And there you have it–two different ways to sharpen your photos!

Posted in Photoshop Tips


a lightroom tip

Mar 29, 2008

(There are days when I want to make out with Scott Kelby for making my life better. This is one of those days. [I’m going to be really humiliated if he ever vanity-googles his name and discovers this post.])

I was reading his Lightroom book last night and read the following tip, which I am now compelled to share with the world:

When you are in the develop module and decide that you want to crop a photo, hit the “L” key twice after you select the crop tool. Now you can move the cropper edges around (and move your photo around underneath the crop area) and see exactly what it will look like when cropped because everything else will be totally dark.

I explain things terribly so I’m sure that makes no sense, but if you have Lightroom and have never tried this, you need to.

Right now.

You’ll want to make out with Scott Kelby, too.

Posted in Photoshop Tips


Adobe launched their “Photoshop Express“–a free web-based photo editing program, and I thought it warranted a little Photoshop Friday even though it’s a day early. ;)

If you already own photoshop, the editing portion is nothing to intrigue you, but it does offer 2 gigs of free storage and a flash slideshow, so you can share photos with family and friends online without resizing for email. That part is neat (though I would never be wooed away from my precious smugmug).

At first glance, it seems to me like a beefed up version of flickr…and hopefully Adobe will do a better job protecting people from the weirdos than flickr has.

You can’t edit RAW files in it, but if you don’t have Photoshop or Elements or Lightroom, it would be very useful to have a free online area to edit your photos (adjust white balance or exposure, crop, resize, do some basic cloning/healing, add fill light, easy color pop and auto correct, etc)

There are a ton of people checking it out right now, so it’s running a little slowly (or at least I hope that’s the reason), but I wanted to be sure to sign in today and snap up a good username before the good ones were gone and I ended up having to add three silent “g”s to my name.  (I feel a burning need to register for every new networking site even if I don’t have immediate plans to use it, because should I ever want to jump on the bandwagon, I want a good username.)

Scott Kelby has some training videos for Photoshop Express that will guide you through the process if you need a little assistance learning the ropes.

Posted in Photoshop Tips