Will: When I grow up, can I marry Ellie?
Me: IF you still want to marry her when you’re grown up, you can.
Will: Yeah. Cause she’s the only girl I like.
Me: That’s nice.
Will: Yeah. She’s the most beautiful girl I like.
Needles and a Pen » Knitting, Sewing, and Nursing School

|
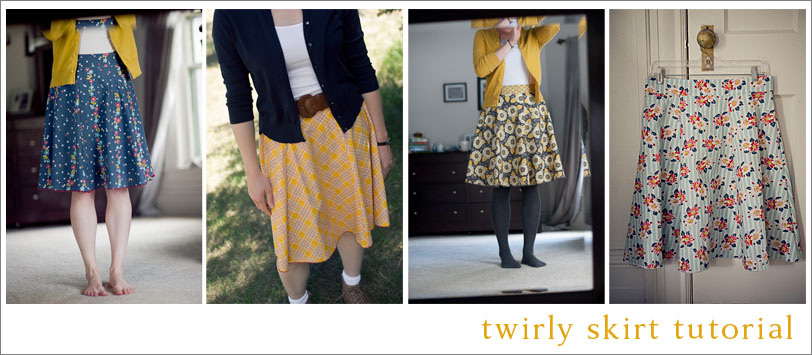
We’ve been on this path before, so I wanted to be SURE that Will had a name before I reported that he was finally SOMETHING in Ellie’s vocabulary. She’s had a few times where she would call him something a few times and then drop it for months. But on Wednesday last week when she woke up and I carried her into our bed, Will wasn’t awake. He was nowhere to be seen. (This is very unusual in the morning.) She looked around and then said “Woah-wee? Woah-wee?” And from that point on he has had a name! She says it every day in all the right ways. Hurray for Woah-wee! He has a name and it stuck! (Willie, for the record, doesn’t seem to like this particular version much. “She’s saying it wrong” he said. He liked Woah-Woah but Woah-wee probably sounds too much like the real thing for him!) I get so many questions about my favorite skirts, and after months of saying that I am thinking about writing a tutorial for them, I’m actually doing it!
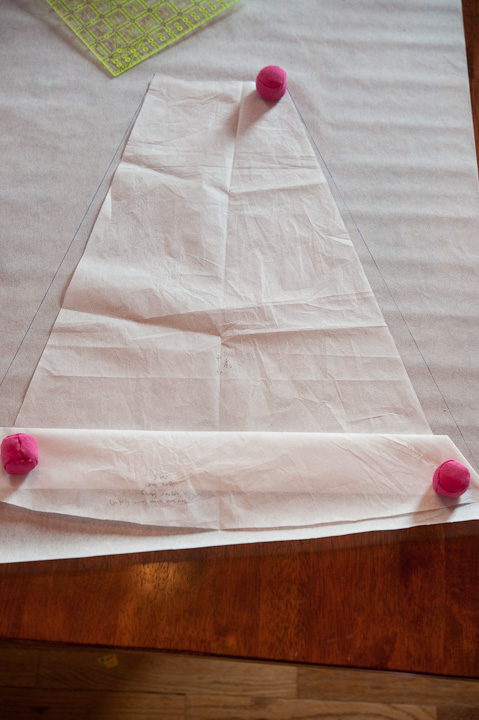
Disclaimer: I don’t really know what I’m doing. I stumbled upon this skirt method when I realized that the Yard Sale Wrap Skirt in Heather Ross’s Weekend Sewing almost exactly fit me with 6 panels. I know from making these enough that if I use a 5/8″-3/4″ seam allowance on the panels, the skirt will fit. The waistband/zipper instructions are totally MacGyvered. What you’ll need (all fabric should be prewashed and ironed): 2 yards of main fabric (optional) 1/4th yard contrasting fabric for waistband An invisible zipper (and invisible zipper foot–don’t stress, these are like $3 and in the zipper aisle) If you want to be really fancy about it, you could also get a hook and eye for the top of the zipper. (I’m not that fancy.) Heather Ross’s Weekend Sewing Yard Sale Wrap Skirt pattern (if you don’t have this book yet, it’s totally worth purchasing it. There are sooooooo many good patterns that it’s not a waste to buy it for this panel–you’ll end up making plenty of other things–I promise!) A serger These instructions take advantage of a serger’s time saving benefits. If you’re sewing this skirt without a serger, you’ll want to use the french seam and hand rolled hem instructions from the Yard Sale Wrap Skirt pattern instructions. If you’re looking at doing a moderate amount of garment sewing, I highly recommend searching Craigslist for used Baby Lock Imagine sergers. The Imagine has auto tension and auto threading which takes all the hard serger stuff out of the equation and makes it as easy to use [if not easier] than your sewing machine. While they are a complete extravagance new (around $1500-$1800),if you are patient, you can occassionally find them on Craigslist for $300-$500. Panel Adjustment Waist adjustments to the panels: I’m 5’5″ and 130lbs and for me, 6 panels with a slightly larger than usual seam allowance works for this skirt in the width. To make this skirt properly, you could find out your measurements and do the proper math to figure out the measurements of the panel width at the top. Or, if you’re reckless and lazy like me, you could sew the panels together in one long line, hold it up to yourself, see how it fits, and make adjustments as needed. Length adjustments: I took off about 5″ off the skirt to keep it right at my knee. I didn’t want to lose the twirl, though, so I had to redraw the side lines and make the angle a little more dramatic. Your goal is to end up with a shorter panel, but have that panel be just as wide at the bottom as the original. Here’s a shot of how I redrafted my panel (since I had already made the original for my first yard sale wrap skirt).
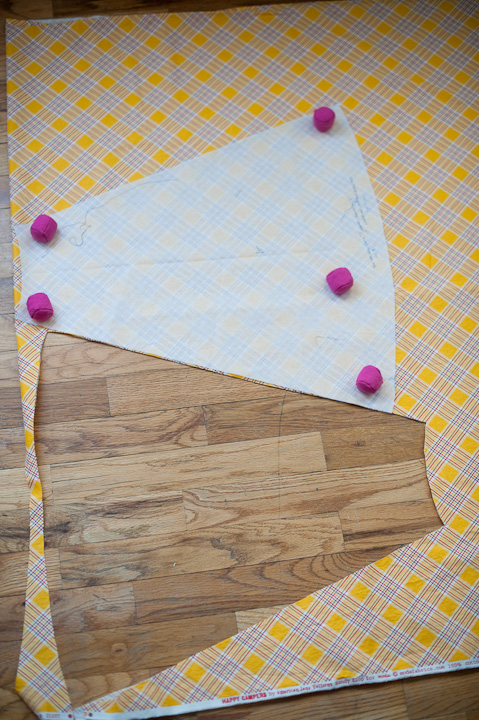
Cutting Fold your fabric so that the selvedges are perpendicular to the fold line, and cut your 6 panels. (Your waistband can be cut from the top section of leftover fabric, or, if you have enough room, it can be cut selvedge to selvedge.)
Cut your waistband. This can be done by either cutting two strips (that you will sew together and have the seam be at the top of the waistband) or cutting a wider strip that you will fold in half. In the past, I’ve always gone with the two strip option, but this time I tried out folding. Either works perfectly. My waistbands have been a variety of widths in the skirts I’ve made. For this particular version I cut a 5 1/2″ strip that I folded in half. I leave the length of the waistband as selvedge to selvedge and trim it once it’s been sewn to the skirt body.
Using a serger, sew the 6 panels together to form one long strip of panels. Next, sew your waistband RIGHT SIDE to the WRONG SIDE of your skirt.
On the top of the waistband, fold over and press 1/2″ toward the wrong side. (Tip: Use one of these hem guides to ensure accuracy.)
Press the seam at the joining of the waistband/skirt toward the waistband and arrange the skirt so that the waistband lies as straight and flat as possible.
Working from the center outward, fold the waistband over so that it just covers the seam and pin it to the right side of the fabric. (Tip: I took this photo halfway through–I use twice that number of pins to prevent stretching/shifting–the top layer of the waistband always wants to stretch for me.)
At this point you’ll cut the waistband so that it fits the skirt body, continuing the angle of the skirt panel so that the waistband is slightly narrower at the top than at the base (since your waist narrows as you get higher up it).
Tip: I usually break here for the evening and start again fresh for the zipper portion. If this is your first invisible zipper, check out an invisible zipper tutorial before continuing. (Warning: I’m going to be absolutely worthless as describing the next few steps, so if you look at the pictures and it still doesn’t make sense, just let me know.) Using a seam ripper or scissors, pick apart the stitches holding the waistband to the skirt so that you can unfold the waistband where you will insert your zipper.
Align and pin your invisible zipper to the edge of the waistband/skirt panel, right side of the zipper to the right side of fabric. The top of the active part of the zipper needs to align to the fold or seam at the top of the waistband. DO NOT PIN THE ZIPPER TO THE BACKSIDE OF THE WAISTBAND–only to the front.
Sew the zipper to the fabric and then repeat on the other side. Your goal is for the waistband to line up well.
Fold over the waistband, enclosing the top part of the zipper within the waistband. Pin. (This photo shows the back of the waistband.)
Topstitch along the bottom of the waistband, removing the pins as you go.
If you zip up your skirt it is ALMOST a skirt. Now you have to sew the seam that continues the line of the zipper. Align the panel edges and sew as closely as possible to the seams that hold in your zipper, following that line down to the hem. I have varying levels of success with this–sometimes my zipper looks pretty good, and sometimes it pokes out a bit at the part where the seam and the zipper meet. I don’t really know what to do differently, though, so I just hope my cardigans hide any zipper issues. 😉
Using the rolled hem stitch on the serger, finish the hem. I like to use a contrasting thread color.
Last step: hand stitch the waistband to the back of the zipper.
I hope this tutorial works for you! If you have any corrections, please let me know! Tip for wearing this skirt: I recently got a wide belt and it is PERFECT for these skirts. It really helps define the waist and looks more ready-t0-wear and less like you made it! The skirts look super cute with ballet flats or boots and you can usually find me wearing a J Crew Jackie O cardigan [yep–that’s the actual name] on top.
If you make one of these, I love to see it! Please link it up: Stupid internet. The very LAST thing I need in this life is another sewing project to start, but I was innocently doing a little mindless blog surfing and saw this quiet book from The Empty Bobbin last week I had a quiet book when I was little, and Ellie loved playing with it while we were in Seattle, but somehow my brain didn’t feel that I had to make one until I saw this page:
I ordered the Piece & Quiet pattern as recommended, and it arrived this weekend. Before you also run to order it, I’m not thrilled with it. There are no diagrams for the construction–all instructions are words only. This annoys me to no end. I, having had “read through all instructions before you begin” beaten into me by standardized testing in elementary schools, want to read through an entire pattern and visualize how it’s going to go before I start in. But if there aren’t any pictures, I have a realllllly hard time visualizing the steps. I don’t want to be blindly sewing sentence by sentence, hoping for the best. But we’ll see how it goes. Maybe once I get going it won’t make me crazy. Maybe I’ll find some pictures of the step-by-step stuff on the internet and feel better. That would be awesome. (Although now that I’ve said that I feel morally obligated to contribute such photos if there aren’t any already.) Anyhoo…I’m obsessed with coming up with quiet book activity page ideas. I’ve got a bunch that I’ve been brainstorming on my own, but have found a whole host of incredibly cute ideas out there and have started a pinterest board dedicated to such great quiet book page ideas. If you know of some that I’m missing, link me up in the comments! I’m planning on making two quiet books–one for Ellie and then a different sort of book for Will, and having those ready for Christmas presents. Anyone interested in an unstructured sew-along for quiet books? Um HECK YES!!!!!!! […..because I need another project tooooo) That would be fabulous. I would love ideas for quiet books. I agree that patterns without any pictures are highly annoying. I just need one picture to see how it will look and can easily go from there. I also don’t really need another project, but these books look great and would be wonderful for my little girls while they are learning to sit still in church! A sew-along would help keep me motivated…so, I’d join in! this looks wonderful!!!! Sweet! I’ll post some plans for the sew along tomorrow (Tues)! Oh such a good idea. I would love to do this too (don’t need a new project but if it is for Christmas…) 🙂 REALLY ENJOY ALL THE GREAT IDEAS ALWAYS LOOKING FOR NEW THING TO FOR THE HOLIDAY THE QUITE BOOKS ARE GREAT I don’t have a website. I don’t really like using the internet that much. But I would be interested in receiving ideas for busy books. I designed my 3 grandsons books a couple years ago, and now I am ready to do 2 for my granddaughters. I would be glad to share a few of my ideas too. I just need to know how to share them, and to sent pictures. I’m looking for good girl ideas.
I was lucky twice on Giveaway Day, winning this vintage pattern from Ejegmama and this set of gorgeous fat quarters from Kristine at A Verb for Keeping Warm!
They were waiting for me when I got home from Seattle and I felt so lucky and inspired! i can’t wait to see what you make with them! such beautiful fabrics and patterns! LOVE that pattern!!! SO cute. |
|
 Sewing







Alli - Oh my goodness, thank you for posting this tutorial! I’ve been admiring these skirts that you made for forever and now I’m so excited to try making one myself! If only I had two yards of nice fabric and the book right now… 😀
Audrey - Thank you! thank you! thank you! I have been loving all of your skirts, and I wanted desperately to make one-to the point I have already bought two yards of fabric because I was determined to try on my own and then bug you for help.:) So excited about this!
Emily - THANK YOU!! This is the perfect skirt!!!
Ali - I MUST make one this week! Now if only I knew how to use my serger… (it’s still in the box! but I did get it off of Craigslist for $200)
Angela - So glad you posted this to the DS quilts site. LOVE your tutorial. You gave so many useful hints and the wearing hints are the best – THANKS!
Oh, and your serger tip is great. I’ve been wanting one, but don’t NEED one. I’ll have to keep an eye on Craig list.
Leigh - thanks! i’ve been admiring your DS blue skirt on flickr and trying to figure out how to make it. I got some of the exact same fabric for the exact same reason! thanks for figuring it out for me!
Jen of Quality Sewing Tutorials - Great tutorial! You’ve been featured on the Quality Sewing Tutorials blog.
We hand select only the best free tutorials and patterns for the home sewist.
Grab a brag button!
Suzanne - Thank you SO much! I have the Heather Ross book and I have wanted to make this very skirt. I appreciate all the suggestions you made for the skirt construction and I’m excited to try this. I don’t have a serger but now I’m kind of wanting one. 🙂
Kelly - Thanks I think this is exactly what I’ve been looking for!