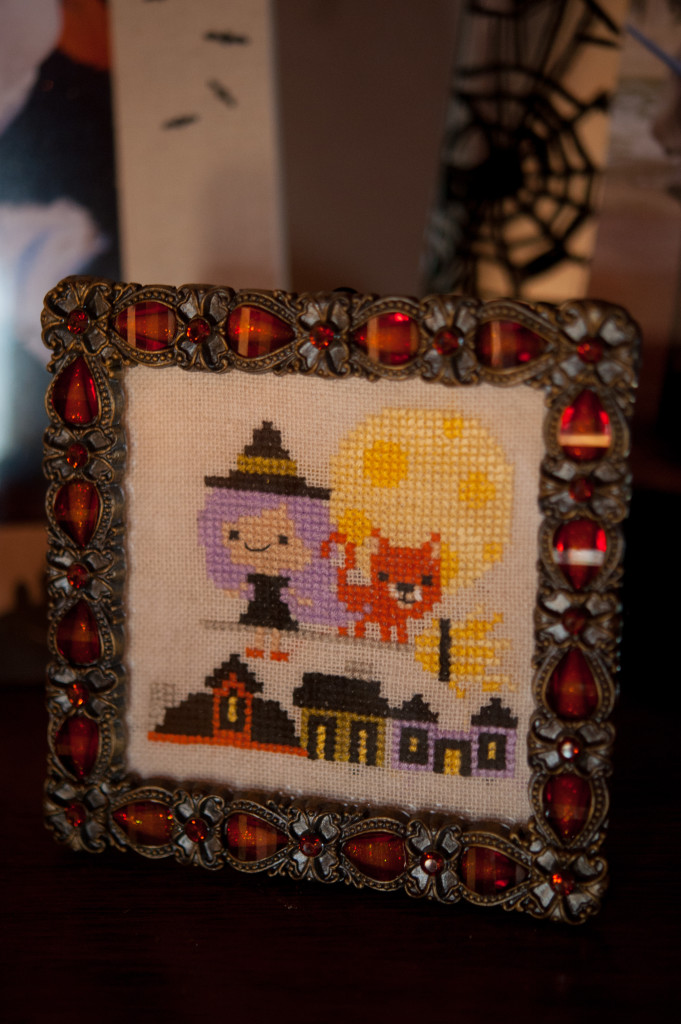
Today it is officially fall, and I am celebrating after passing my assessment check off in nursing school (woot woot, 2 down, only 8 million more skills checkoffs to go!) so I broke out my big orange and black bin and got my Halloween decorations on. In the process of unpacking all of my Halloween treasures, I found these two cross stitch projects from last fall that never made it to the blog. They were my first and second ever cross stitch attempts! Both patterns are from The Frosted Pumpkin Stitchery and were amazing fun quick crafty projects! I’m still looking for the perfect frame for the little Frankenstein piece, but hopefully I’ll find something this year for it!
.jpg)
.jpg)
In our family the baptism outfit is full of sentimental touches, from the family gown to the bonnet made from a handkerchief. At the baby’s baptism it’s a bonnet, but made from a handkerchief it’s ready to be converted for the baby’s future wedding day. For my goddaughters’ baptisms I chose handkerchiefs with German lace to honor their German heritage from Bumblebee Linens. I was concerned about the size–the heirloom handkerchiefs are 10″ instead of 12″, but the bonnets fit fine. They are super easy to make!

Me with my newest godbabies

Will with his godmother almost a decade ago!

Poor Eloise (2010) was 10 months old for her baptism (hazard of having international godparents) and we had to squeeze her into both the gown and the bonnet!
Supplies:
- Handkerchief
- Ribbon for ties
- Rosettes

How to make a handkerchief bonnet:
- Fold one end of the handkerchief back about 3-6 inches and press with a hot iron. (This will be the brim.)
- Fold the opposite end back 1-3 inches and press. (This will be the back of the bonnet.) Open up and see that pressed line.
- With a needle and thread, make a running stitch along the pressed fold at what will be the back of the bonnet–these are your gathering stitches.
- Cinch that back closed and tie off the thread you had made the running stitch with.
- Make a bow with ribbon and tack it onto the spot where you tied off the gathering stitch. The back of the bonnet is now done!
- Sew ribbon onto the front corners of the bonnet–these are your straps.
- Sew rosettes on top of the raw ribbon edge.
(For step by step photos, see the Bumblebee Linens tutorial.)

When I first started posting trail reviews I was really excited to write about Red Rocks Canyon Open Space…but then it was closed for an unannounced period due to flooding damage. I was worried it would turn into a Williams Canyon closed-for-years situation, but then it reopened on the 4th of July weekend! Thrilled, we checked it out that Monday to make sure things were as I remembered. In all the important ways (fossils, fun easy trails) it was. It was also exceptionally crowded for a Monday-that-was-threatenting-to-storm. Given its closure, this expect this one to be crowded for a few more weeks as people celebrate its reopening.
Pros: The elaborate trail system allows you to make a hike of any possible length. It’s popular and accessible, so this is a great weekday hike you can feel confident doing alone with your little ones. It’s as beautiful as Garden of the Gods, but much more rugged–while the trails are easy for all levels, you won’t find the pavement or dense crowds you’ll find at Garden of the Gods. As an added bonus, on the western edge of the park you can find fossils in the sandstone–giant ammonites as well as clams/mussels. A total treat for budding geologists!
Cons: Along with the published trails, there are also a number of social trails, which can make staying on your intended route difficult. The good news is that it’s a not a huge park and the social trails eventually lead back to a main established trail. This park is also popular with mountain bikers, so you may find yourself stepping off the trail quite a few times on a busy day. Finally, there is not much in the way of shade, so if you take your sea level visitors on a four mile hike in the middle of a July afternoon, force plenty of water down them. They’re bound to underestimate the amount they will need! (I’m looking at you, Kelly May!)
Difficulty/distance: A dense network of easy trails great for young families.
Directions: There are two parking lots for the park. The one on the western side is the less formal parking lot, but is the closest to the fossils. If you want to look at fossils without actually walking, this is the one for you. The more obvious parking lot is farther east. For both, take Highway 24 west toward Manitou Springs. For the western parking lot, take a left on 31st street. The parking lot will be on your right. For the main parking lot, stay on Highway 24 past 31st street and take a left onto Ridge Road. The park is visible from Highway 24.
Trail teaching:
- Fossils! Along the western side of the Hogback Valley trail you’ll find sandstone that houses ammonite and clam/mussel fossils. If you go off trail and climb to the top and then down the back side you’ll find many. If you don’t fancy that much scrambling (and the feeling of being Off Trail and therefore Naughty), there are some very accessible ones if you follow the trail to the western parking lot as it branches off the Hogback Valley Trail. You only have to go off trail a few feet. This is the view from the trail:

It is located about halfway between the two round holes in the rock (which probably have an actual name but ’round holes’ it is) just above kid eye level.

A closeup:

Mussels and/or clams near the ammonite:

- The history of the park from ColoradoSprings.gov which includes information on the old quarry in the park:”Activity on Red Rock Canyon dates back to 7000 B.C., during the Archaic Stage. Due to its close proximity to Fountain Creek and its abundant wildlife, this was an ideal location for settlement.During the late 1800s the property provided many building supplies for Old Colorado City and the surrounding communities. Material taken from the quarries included Gypsum, building sand and sandstone blocks. The Kenmuir Quarry, mined during this time, was open seven days a week due to demand. Declining demand for stone and increased demand for concrete and steel, forced the quarry to close in the early part of the 20th Century.
Opening in 1886, the Colorado-Philadelphia Company Mill used the land to refine the ore shipped by train from the gold mines in Cripple Creek. It was the largest mill of its kind in the United States, until the new Golden Cycle Mill was built in the early part of the 1900s.
John George Bock purchased the property in the 1920s-1930s and later willed it to his two sons. John S. Bock, the eldest son, continued to live there until his death in 2002. The family had grand plans for the property including a resort community with convention center, high-rise towers, commercial centers and a golf course. In the end, they were only able to build a few residences and outbuildings, two dozen mobile home sites, a 53-acre landfill, and two gravel quarries. In 2003, the City of Colorado Springs purchased the Red Rock Canyon property to be used as public open space.”
- Lots of opportunities to talk about the different rock formations exposed here. We took this walk just a few days after the Dinosaur Ridge and Triceratops Trail walks, and so I was able to point out to the kids that these were the same formations we saw up in Golden. Here’s a link to a map detailing the different formation and their period.
- The recent flood damage is a great illustrator to kids of how powerful water is at carving landscapes and eroding away rock.
Photos:


Eeek! My littles got big!

The old quarry:


Photos on July 6 2015 after the park reopened of some of the flood damage:


Resources:
Wednesday, June 17, 2015
Posted in faith
Are you participating in The Book of Proverbs – One Chapter A Day online bible study at womenlivingwell.org? This is my first time participating in an online bible study and I’m really enjoying it. It just started Monday, so it’s not too late to join in! I did get the journal, but it wasn’t what I’d expected–it’s just the same thing over and over again (the various chapters aren’t included [I always enjoy comparing the wording of other bible editions with my own, but this just includes a single verse from the chapter opposite each journaling page with no additional commentary), so if you already have a journal for bible study you’re better off using it–you can just write using the SOAK method (explained on the website) on each page.

I have a tendency to practice daily bible study only during Lent and Advent and let it slip the rest of the year, so it’s been nice to incorporate bible study into my morning routine in ordinary time. 🙂 I’m looking forward to the various guests posts on Women Living Well and hearing different takes on Proverbs!
Monday, June 15, 2015
Posted in quilts
I finished the binding on this Joel Dewberry fabric modern crosses quilt last week. I used some wool batting that I won for it, and I was very excited to see how it would wash up–I’ve heard so many great things about wool batting! I was surprised that it shrank less than my usual cotton batt, so it ended up crinkling up a little less than usual.


The back is simple patchwork with the leftover fabric:
For the construction, I improvised by starting with 8″ squares, slashing them and adding strips of contrasting fabric, sewing them together again, rotating them 90 degrees, and then slashing and inserting the contrasting fabric again. Then they were squared up to 8″ again. It’s a more time consuming quilt block than I expected, so be aware of that if you pick this as a “quick block!” 🙂
Mt Herman is a great ‘cheat’ of a hike, since you get to drive most of the way to the summit before finishing off the final mile yourself. We went last year before the shooting in the area was closed, and I am excited to go back now that it isn’t accompanied by the sound of constant gunfire!

Pros: The reward from this hike are the 360 degree views at the top of Mt Herman. It’s a quick, pretty hike worth a visit.
Cons: When we went, sharing the hike with target practice was a definite bummer, but that’s gone now. The trailhead only has room for a couple of cars, so this has the potential to be a problem on a busy day.
Difficulty/distance: 2.3 miles, a good beginning hike for families. There are some steep sections, but it is roughly comparable to Mt Cutler, my favorite beginning hike.
Directions: Per the forest service: ‘From Monument, travel west on 2nd Street. Just past the railroad tracks, 2nd St. dead ends at a T. Turn left (south) on Mitchell Rd. Travel approximately 1/2 mile to Mt. Herman Rd. Turn right (west) on Mt. Herman Rd and travel for approximately 7 miles beyond the paved portion of road. The trailhead is a wide turnout on the right side of Mt. Herman Rd.”
Trail teaching:
- Portions of the area were damaged by the Waldo Canyon Fire, so it’s an excellent opportunity to talk about wild fire and regrowth.
- At the top you have a great view of the area, so you can talk about the location of various landmarks/towns the kids know.
- You can see the mesas in the Larkspur/Palmer Lake areas. (Mesas get their name from Spanish explorers in the mid-1500s who thought the formations in the American southwest resembled tables (“mesa” in Spanish). “Butte” and “mesa” describe similar shapes, but mesas are larger than buttes. Mesas have a hard layer of rock at the top (“cap rock”)–often cooled lava–that resists the type erosion that is caused by the hard sudden rainstorms that occur in the American southwest. The top layer of igneous rock resists erosion, but the softer sedimentary rock around the igneous rock is eroded away. This creates the steep sides of the mesa–anything not directly under that tough igneous rock gets washed away in rainstorms.)
Photos:


Will didn’t bring his coat, which we discovered at the summit when it began to snow. We had an extra coat for Ellie at the bottom of the daypack that I’d forgotten to remove, so Will wore The Coat of Shame for the descent.

|
.jpg)

.jpg)

